2020 Developer ToolsGraphics & GamesPhotos & CameraAudio & Video
WWDC20 · 9 min · Developer Tools / Graphics & Games / Photos & Camera / Audio & Video
Optimize the Core Image pipeline for your video app
Explore how you can harness the processing power of Core Image and optimize video performance within your app. We’ll show you how to build your Core Image pipeline for applying effects to your video in your apps: Discover how to reduce your app’s memory footprint when using CIContext, and learn best practices for using AVPlayView or MTKView view classes for video playback with Core Image filters. Additionally, find out why you should write your own custom kernels in the Metal Shading Language, and learn performance tips for optimal usage of Metal command queues in your Core Image pipeline.
Watch at developer.apple.com ↗Code shown on screen · 7 snippets
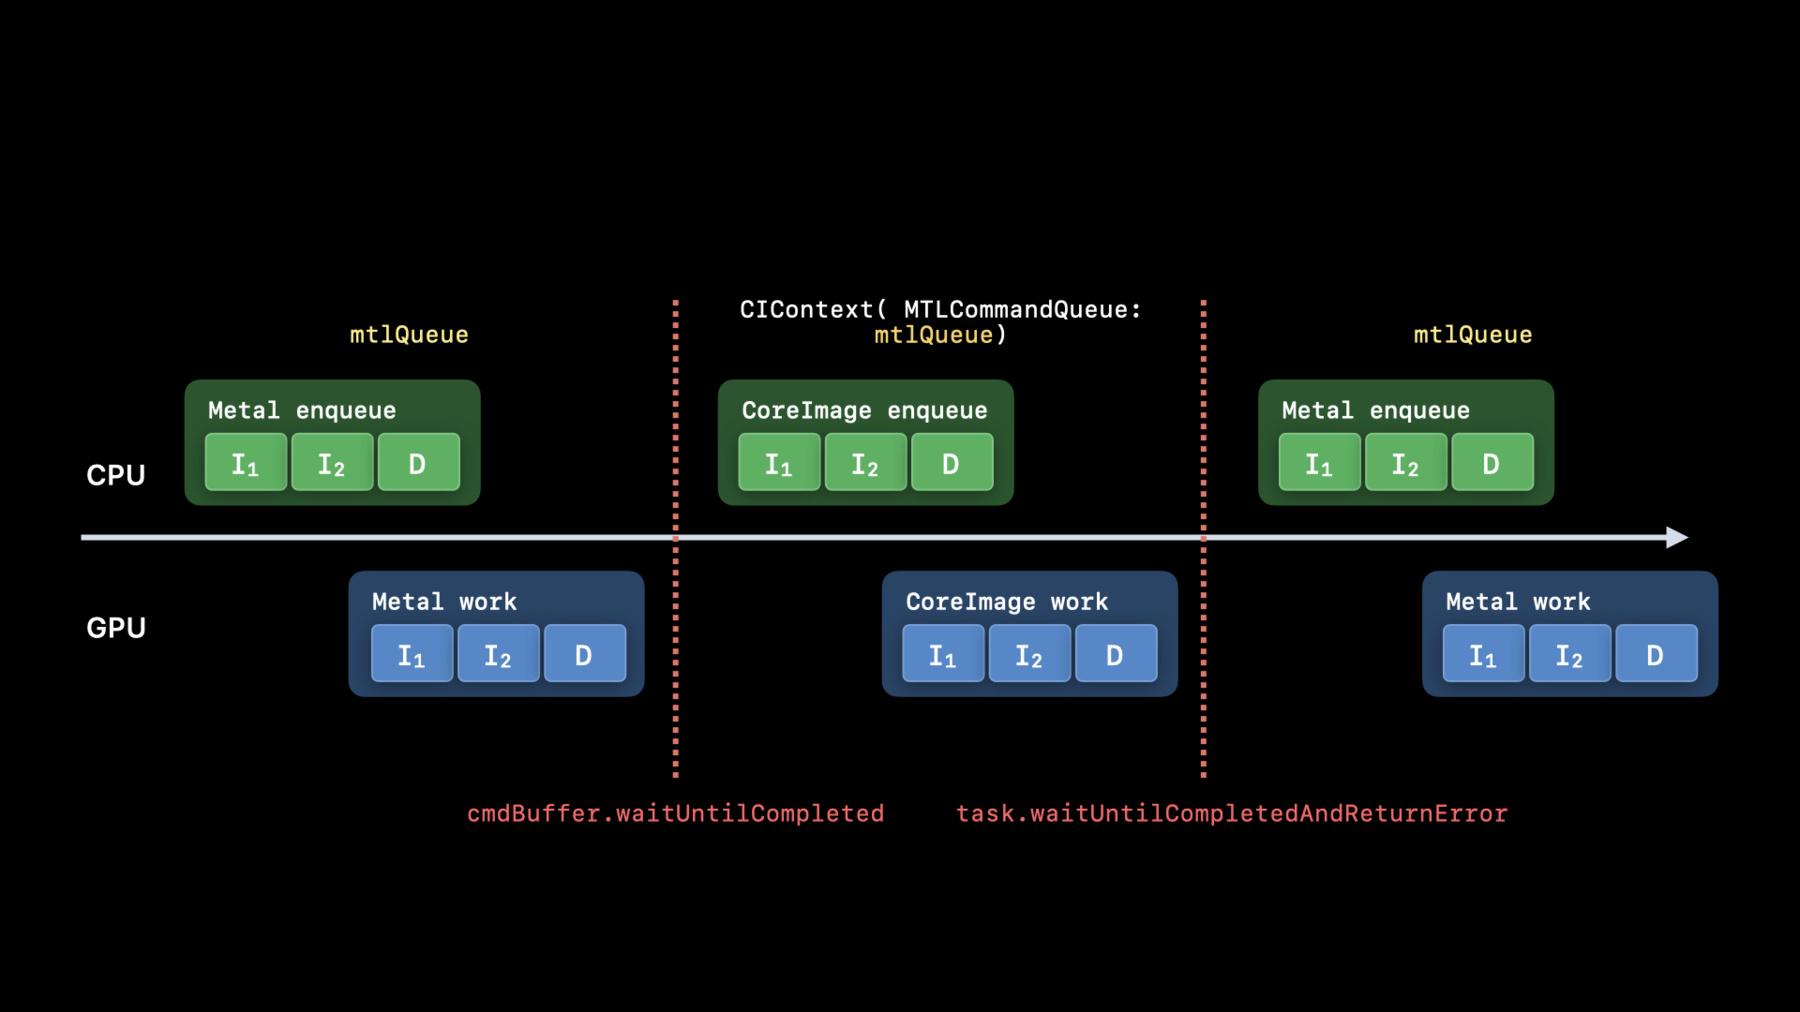
Creating CIContext
let context =  CIContext(options: [
    .cacheIntermediates : false,
    .name : ”MyAppView”
])
Creating CIContext 2
let context = CIContext(MTLCommandQueue : queue, options: […])Use builtins Whenever possible
import CoreImage.CIFilterBuiltins

func motionBlur(inputImage: CIImage) -> CIImage? {
    let motionBlurFilter = CIFilter.motionBlur()
    motionBlurFilter.inputImage = inputImage
    motionBlurFilter.angle = 0
    motionBlurFilter.radius = 20
    return motionBlurFilter.outputImage
}
Put your kernels in .ci.metal sources
// MyKernels.ci.metal
using namespace metal;
extern "C" float4 HDRZebra (coreimage::sample_t s, float time, coreimage::destination dest)
{
float diagLine = dest.coord().x + dest.coord().y;
float zebra = fract(diagLine/20.0 + time*2.0);
if ((zebra > 0.5) && (s.r > 1 || s.g > 1 || s.b > 1))
return float4(2.0, 0.0, 0.0, 1.0);
return s;
}Using AVPlayer View
let videoComposition = AVMutableVideoComposition(
    asset: asset,
    applyingCIFiltersWithHandler:
    { (request: AVAsynchronousCIImageFilteringRequest) -> Void in
        let filter = HDRZebraFilter()
        filter.inputImage = request.sourceImage
        let output = filter.outputImage

        if (output != nil) {
            request.finish(with: output, context: myCtx)
        }
        else { request.finish(with: err) }
    }
)
Using MTKView
class MyView : MTKView {
    var context: CIContext
    var commandQueue : MTLCommandQueue

    override init(frame frameRect: CGRect, device: MTLDevice?) {
        let dev = device ?? MTLCreateSystemDefaultDevice()!
        context = CIContext(mtlDevice: dev, options: [.cacheIntermediates : false] )
        commandQueue = dev.makeCommandQueue()!

        super.init(frame: frameRect, device: dev)

        framebufferOnly = false  // allow Core Image to use Metal Compute
        colorPixelFormat = MTLPixelFormat.rgba16Float
        if let caml = layer as? CAMetalLayer {
            caml.wantsExtendedDynamicRangeContent = true
        }
    }
Using MTKView 2
func draw(in view: MTKView) {

        let size = self.convertToBacking(self.bounds.size)
        let rd = CIRenderDestination(width: Int(size.width),
                                     height: Int(size.height),
                                     pixelFormat: colorPixelFormat,
                                     commandBuffer: nil)
                  { () -> MTLTexture in return view.currentDrawable!.texture }

        context.startTask(toRender:image, from:rect, to:rd, at:point)

        // Present the current drawable
        let cmdBuf = commandQueue.makeCommandBuffer()!
        cmdBuf.present(view.currentDrawable!)
        cmdBuf.commit()
   }
Resources
Related sessions
-
 22 min
 -
 9 min
9 min -
 27 min
 -
 6 min
6 min -
 7 min
7 min